Disclosure: As an Amazon Associate and eBay Partner Network publisher, we earn from qualifying purchases. This doesn’t affect what we recommend or how we describe it.
7 min read
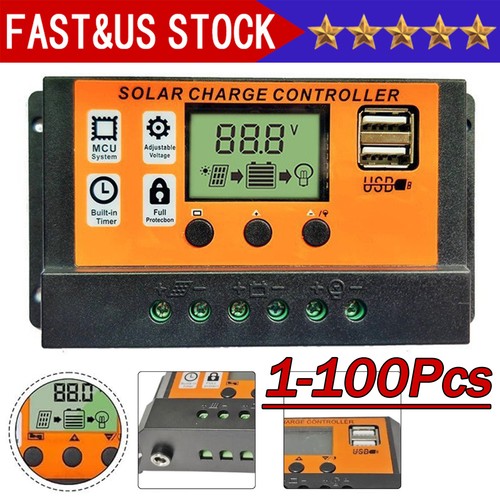
Trying to set up your solar power system and stuck on choosing or configuring the right charge controller? Whether you’re wiring up an off-grid cabin, a camper van, or a tiny home, the charge controller is the gatekeeper that protects your batteries and makes your whole solar setup run smoothly. Selecting the wrong type, setting it up incorrectly, or missing key specs can mean wasted money—or worse, fried batteries. Let’s break down exactly how to choose, size, and set up a top-tier solar charge controller, with practical instructions and real-world advice for beginners who want reliable off-grid power without headaches. For more detail, see Victron Energy Unlimited guidebook.
Side-by-Side Comparison: Four Leading Solar Charge Controllers
| Product Description | Max PV Input (Voc / Watts) | Battery Voltage Range | Charge Type | Display/Monitoring | Key Pros | Cons/Limitations |
|---|---|---|---|---|---|---|
| 40A MPPT unit with large LCD, Bluetooth app, and adjustable user profiles | 100V / 520W @ 12V 1040W @ 24V |
12V / 24V auto | MPPT (99% tracking) | LCD + App |
|
|
| 20A PWM controller with basic LED indicators and preset battery modes | 50V / 260W @ 12V 520W @ 24V |
12V / 24V auto | PWM | LEDs only |
|
|
| 60A MPPT controller with dual USB ports, built-in temperature sensor | 150V / 800W @ 12V 1600W @ 24V 3200W @ 48V |
12V / 24V / 36V / 48V | MPPT (98% tracking) | LCD |
|
|
| 30A all-in-one MPPT with WiFi, programmable relays, and datalogging | 120V / 400W @ 12V 800W @ 24V |
12V / 24V auto | MPPT (99% tracking) | LCD + WiFi |
|
|
Interested in exploring the category? Open the category →
Why Charge Controller Type Matters for Your Off-Grid System
Solar charge controllers come in two main types: PWM (Pulse Width Modulation) and MPPT (Maximum Power Point Tracking). PWM controllers are simple and budget-friendly, best for small systems under 400W where panels and batteries are matched in voltage. MPPT controllers cost more but can boost charging efficiency by 20–30%, especially in larger systems or when using higher-voltage solar arrays. If you’re running a 24V or 48V battery bank, have more than 400W of solar, or want to future-proof your setup, MPPT is almost always worth the investment. For small, basic systems—such as a weekend camper with a single 100W panel—a PWM controller gets the job done cheaply.
Key Sizing Decisions: Amps, Voltage, and PV Input
Choosing the correct size charge controller is critical. Undersizing risks overheating or controller failure; oversizing wastes money. Here’s how to get it right:
- Amperage: Your controller’s amp rating must be at least 25% higher than the max current your panels can produce. For example, if your array’s short-circuit current (Isc) is 32A, choose at least a 40A controller.
- Voltage: The controller must match your battery bank voltage (12V, 24V, 48V). Many MPPTs auto-detect, but double-check.
- PV Input Voltage: Look for a “max PV input” spec (usually 100V–150V). This must be higher than your panel configuration’s Voc (open circuit voltage) but never exceeded. For series-wired panels, add up their Voc values—stay well below the controller’s limit, especially in cold climates where Voc rises.
Want to compare real-world options by these specs? See today’s deals on top-rated units.
Programming Your Charge Controller: Critical Settings for Battery Life
Most beginners overlook the importance of correct programming. Every battery chemistry—AGM, flooded lead-acid, LiFePO4—needs specific charging voltages and profiles:
- Absorption Voltage: For 12V systems, expect 14.4V–14.6V for flooded/AGM, 14.2V–14.6V for LiFePO4.
- Float Voltage: Usually 13.2V–13.8V for lead-acid, 13.4V–13.6V for LiFePO4.
- Low-Voltage Disconnect: Set to 11.5V–12.0V for lead-acid, 12.0V–12.4V for LiFePO4 to avoid deep discharge.
- Temperature Compensation: Most controllers include a sensor; enable it for lead-acid banks to prevent over/undercharging in temperature swings. LiFePO4 does not require this.
Always check your battery’s spec sheet, then manually program these values if your controller allows. For sealed units with preset profiles, pick the mode that matches your battery type. Skipping this step is the fastest way to shorten battery life.
Installation and Monitoring: What to Expect and What to Avoid
Most top charge controllers offer plug-and-play wiring blocks, but you’ll want to:
- Mount the controller vertically, in a cool, dry spot with airflow—never in direct sunlight or next to batteries.
- Use appropriately sized wire and fusing for both input (solar) and output (battery) connections, per the controller’s amp rating.
- Connect the battery bank before the solar array, to prevent voltage spikes that can damage the controller.
- Check the display or app for correct status: battery voltage, charging current, and error codes. A good unit makes it easy to spot problems fast.
Want a model with app-based monitoring or remote web access? Compare options for advanced features.
Common Beginner Mistakes and How to Avoid Them
In the field, I see these issues again and again:
- Choosing a controller too small for their future panel upgrades
- Wiring panels in series without checking the total Voc against the controller’s max input
- Not programming the right charge profile for their battery chemistry
- Mounting the controller in a hot, enclosed space, leading to derating or early failure
- Ignoring the need for a battery temperature sensor (critical for lead-acid longevity)
Plan for your real-world usage and a little headroom—don’t just buy for today’s needs. View what’s available in controllers designed for reliable off-grid service.
Related Guides
- How to Choose the Right Solar Charge Controller for Lithium Batteries
- Solar Powered Phone Chargers That Actually Work: A Practical Buyer’s Guide
- A No-Nonsense Guide to Solar Panel Mounting Brackets That Last
- Best Solar Extension Cables: What to Look For and What to Avoid
- Browse all Charge Controllers →
FAQs: Real-World Solar Charge Controller Challenges
How do I know if I need MPPT or PWM for my system?
MPPT is the best choice if your solar array is over 400W, your battery voltage is 24V or higher, or you want to use higher-voltage (often cheaper) solar panels. PWM is fine for small, basic 12V setups with matched panel and battery voltages. MPPT pays for itself in efficiency for larger or expandable systems.
What’s the safest way to size a charge controller for future upgrades?
Pick a controller with at least 25–30% more amp capacity than your current needs. If you have 300W of panels now (about 25A max at 12V), a 40A controller gives room to expand to 480W–500W later. Always consider your long-term plans when buying.
Can I use a charge controller with lithium (LiFePO4) batteries?
Yes, but only if the controller supports user-programmable charging parameters or has a dedicated lithium profile. Look for models that allow you to set custom absorption and float voltages in the 14.2–14.6V (absorption) and 13.4–13.6V (float) range for 12V LiFePO4. Never use a controller with only “sealed” or “flooded” options for lithium batteries.
Is it safe to connect multiple charge controllers to one battery bank?
Yes, as long as each controller is connected to its own solar array and the battery bank can handle the combined charge current. This is common in larger off-grid systems. Make sure all controllers are programmed with the same charge profile to avoid conflicts.
Why does my charge controller show “overvoltage” or “PV input too high” errors?
This means the combined open circuit voltage (Voc) of your series-wired panels exceeds the controller’s max PV input rating. Double-check your panel specs and local temperature conditions—Voc rises in cold weather. Always stay at least 10–15% below the controller’s max PV input to prevent damage.
How important is a battery temperature sensor?
For lead-acid batteries, a temperature sensor is vital—it adjusts charging voltage to prevent overcharging in heat and undercharging in cold. For lithium (LiFePO4), it’s less critical, but some batteries have built-in BMS that will disconnect if temps are out of range. Use the sensor if your controller and batteries support it, especially in outdoor or unheated setups.
Can I use a charge controller for both solar and wind input?
No. Standard solar charge controllers are not designed for wind turbines, which need different voltage and current handling. Never connect a wind turbine to a solar controller unless the manual specifically allows it.
Final Checklist: Choosing and Setting Up Your Solar Charge Controller
- Calculate your max solar array current and voltage—choose a controller with at least 25% extra capacity
- Pick MPPT for efficiency and flexibility, PWM for small/simple systems
- Verify battery compatibility and ensure programmable charge settings for your chemistry
- Mount in a cool, accessible spot with good airflow
- Program charge voltages according to your battery’s spec sheet—don’t trust factory presets
- Monitor regularly using the display, app, or web portal to catch problems early
With the right controller, sized and set up properly, your off-grid system will run more efficiently and your batteries will last longer. Take the time to compare specs, plan for expansion, and program carefully—you’ll save money and headaches down the road.